You've probably already done the first bit of research. Maybe you've stood at the front door after a delivery went missing, or looked at a dark drive on the phone and realised the old battery camera isn't cutting it. At that point, cctv installation at home stops being a nice-to-have and turns into a practical job, but the systems that look simple online can go wrong fast if you buy before you plan.
In the UK, this isn't a niche move any more. YouGov polling reported by The Telegraph found 17% of Britons had installed CCTV at home, rising to 30% among 18 to 24-year-olds, and 40% had added a camera, alarm or another measure in the previous year because of crime fears (The Telegraph). That tells you the job is now mainstream, but mainstream doesn't mean foolproof. The people who end up disappointed usually make the same three mistakes, they buy the wrong recording architecture, they ignore privacy and neighbour issues, and they discover at night that the footage is too dark, too blurry or too reflective to matter.
Table of Contents
- Planning Your Home CCTV Before You Buy Anything
- Choosing the Right Camera and Recording System
- Mounting, Cabling and Power on Installation Day
- Configuring the NVR or DVR and Getting Remote Access Working
- Night-Time Performance and the Problems Most DIY Installations Miss
- UK Legal and Privacy Rules Every Homeowner Must Follow
- When to DIY and When to Call a Professional Installer
Planning Your Home CCTV Before You Buy Anything
A homeowner comes back from holiday, scrolls through the phone gallery, and realises there's no clear record of what happened on the drive. That's the moment people usually start shopping, but the better move is to walk the property first and make the cameras earn their keep before a single box arrives.
Start with the choke points, not the catalogue
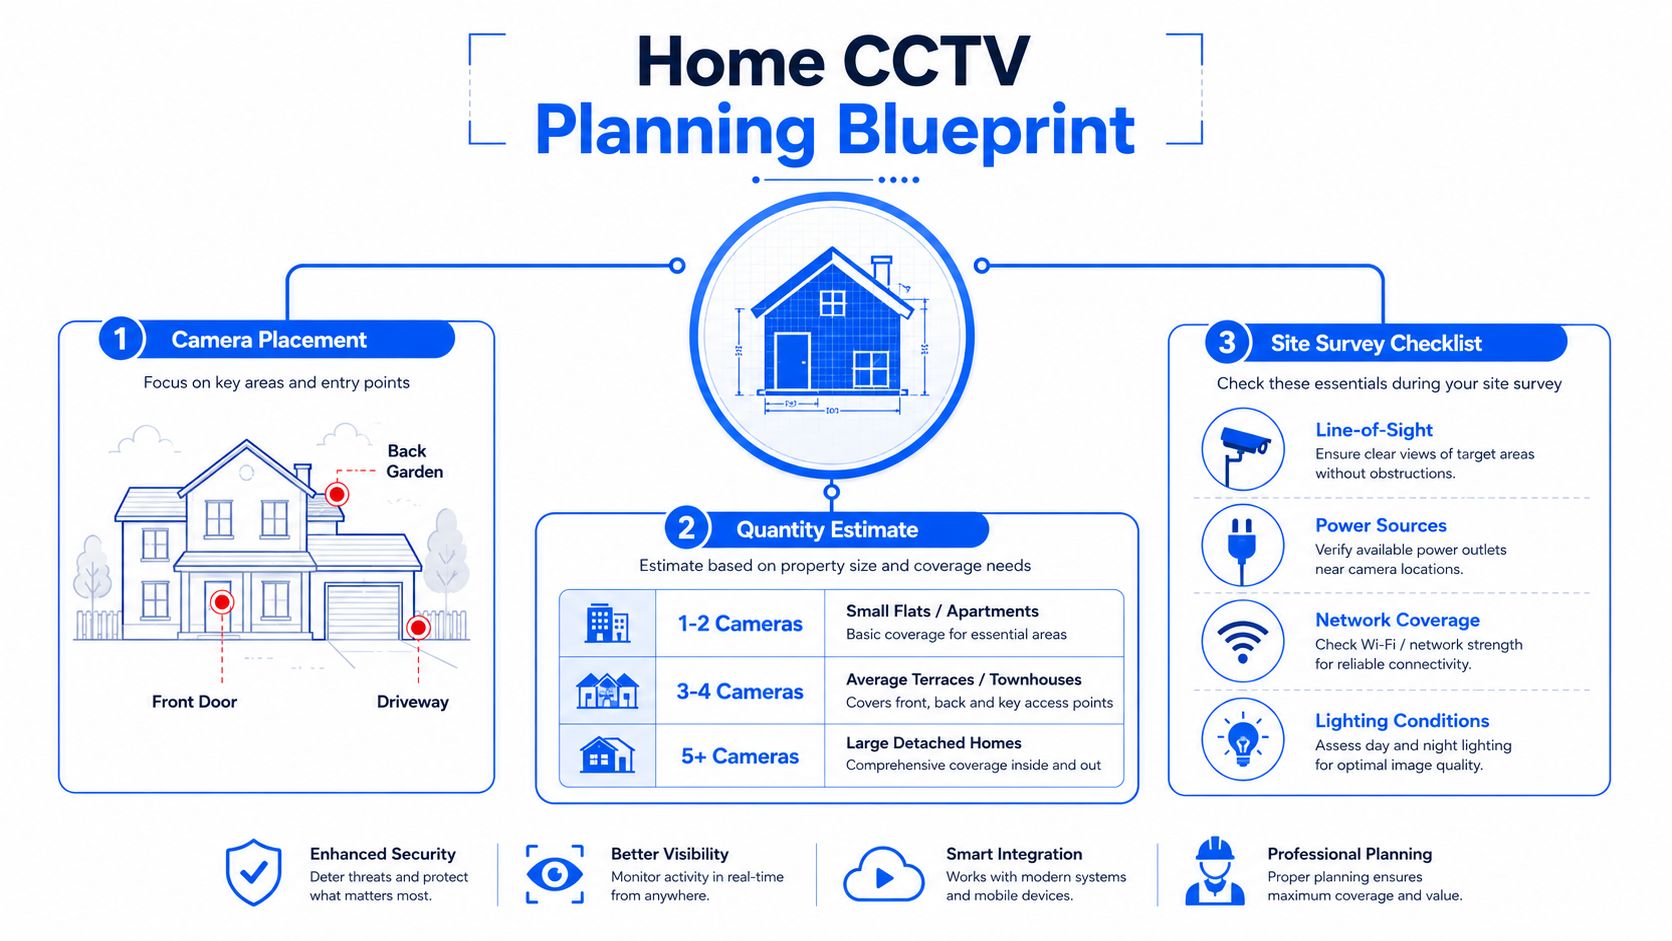
Take a sheet of paper and sketch the boundary of the home. Mark the front door, back door, side gate, driveway, and any path someone would naturally use to reach the house. Those are your choke points, and they matter more than brand names or features because a well-placed camera at an access point beats three cameras pointed at empty grass.
A proper site survey should also show you the awkward parts. Look for glare from low sun, reflective windows, porch lighting, and any place where a camera would end up staring into darkness at night. The practical installation guides say the site survey comes first, then coverage planning, then hardware choice, because the layout decides the system, not the other way round (practical home CCTV installation workflow).
Practical rule: if you can't draw the coverage area on a rough sketch of the house, you probably haven't planned the install properly.
Count cameras by purpose, not by habit
The mistake I see most often is buying extra cameras because the bundle looks complete. A better approach is to ask what each camera is supposed to capture. One camera might cover the front door and porch, another the driveway approach, another the back garden exit, and that's often enough if the angles are clean.
The UK market shows that people tend to install camera coverage around the perimeter rather than turning the whole property into a surveillance grid. Real Homes reported 40% of British homeowners had some form of security camera installed, with 44% of camera-owning households using an outdoor camera and 31% owning a smart doorbell (Real Homes). That pattern fits what works. Most homes need coverage at the entrances first, then blind spots, then any place where someone could move out of view.
A simple way to balance cost and coverage is this, every additional camera should either remove a blind spot, improve evidence quality, or reduce the chance of a missed approach. If it doesn't do one of those jobs, leave it out.
Choosing the Right Camera and Recording System
The main decision in cctv installation at home is the recording setup, not the camera shell. If that part is wrong, the system may look modern but behave badly once you start using it day to day. Get it right, and the kit is easier to maintain, gives you better footage, and causes fewer headaches when you need to check a recording.
The four setups that matter in a UK house
PoE IP with an NVR is usually the cleanest option for a serious home install. One Ethernet cable carries power and data to each camera, so the system stays tidy and stable, especially if you want local recording you can rely on. Wired systems still need sensible cable routing and protection, but PoE is the setup most likely to give dependable footage without depending on Wi-Fi that drops out or slows down.
Coax with a DVR suits homes that already have older cabling, or properties where you want to reuse what is already in place. It is familiar and can still work well, but it is less flexible than IP and does not offer the same straightforward network integration. Wireless NVR kits cut down the cabling work, which helps in a flat or on a lighter DIY job, but weak Wi-Fi and radio congestion can make them awkward if the walls are thick or the camera run is long.
Then there are battery or mains Wi-Fi cameras, which are usually the easiest to fit and the quickest to get up and running. They suit a front door, a small terrace, or a property where drilling through finished walls is something you want to avoid. The trade-off is that they depend more heavily on the network and, in many cases, on cloud services or subscriptions.
The broader UK adoption picture makes that mix easy to understand. The Telegraph reported YouGov polling showing CCTV is already part of mainstream DIY home security, especially among younger adults who are comfortable with app-based monitoring (The Telegraph). If you want a closer look at how AI-driven camera options are being packaged, Premier Broadband AI cameras is a useful reference point.
Match the system to the property
A small flat usually does not need a full perimeter system. A single smart doorbell or one well-placed camera may be enough if the job is front-door evidence and delivery monitoring. A terrace often needs front and rear coverage, while a semi-detached house or larger plot starts to justify multiple camera points and a recorder.
If the property only has one clear approach, do not overcomplicate it. One strong camera can be better than four weak ones.
For features, focus on field of view, infrared performance, and usable audio if local rules and consent allow it. Resolution only helps if the camera is in the right place and the scene is not full of glare or movement. That is why a tidy IP system with sensible camera placement usually beats a fancier wireless bundle with poor sightlines.
Mounting, Cabling and Power on Installation Day
Installation day is where most DIY jobs stop looking simple. The camera goes up, then the cable route becomes awkward, the drill bit hits brick in the wrong place, or the camera ends up with a clear view of the sky and very little else. Good preparation removes most of that pain before the first hole is drilled.
Put the camera where weather and tampering are both less likely
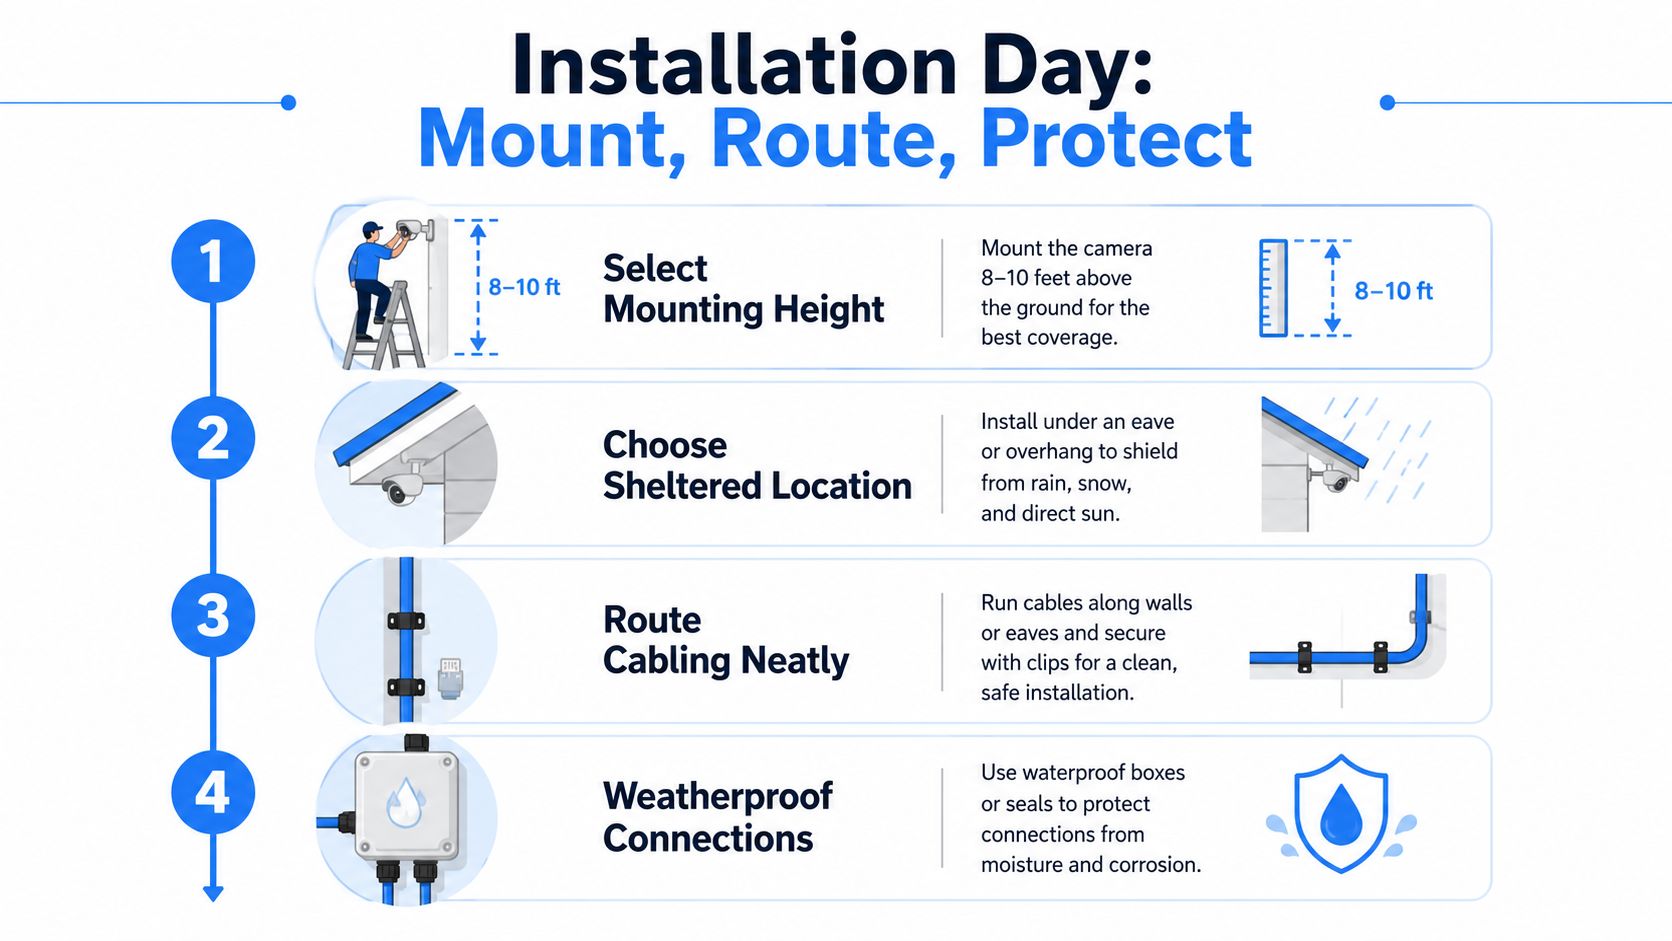
A sensible mounting height is around 8 to 10 feet, because it gives a decent view without making the camera easy to reach. Outdoor units are usually best placed under eaves or another sheltered position, which helps protect the housing from weather and cuts down the chance of rain causing false motion or splashing the lens.
Route the cable by the nearest practical path. A short, tidy route through a loft space is usually better than a long external loop if the property allows it. If the cable has to stay outside, put it in conduit and seal every junction against damp and draughts. Drill through the wall once, keep it neat, and angle it slightly to the outside so water does not track back in.
Use the nearest cable route and avoid the common DIY errors that leave systems unreliable, such as poor cable paths and weak wireless coverage. That is plain advice, but it is the sort of detail that keeps the system working after the install is finished. If you want a broader reference on installation order and kit choice, the installation guidance is a useful starting point.
Power cleanly, then test before tidying up
PoE keeps power straightforward because one cable does both jobs. If you are using Wi-Fi cameras or a DVR setup that needs local power, keep the supply dry, accessible, and protected from being knocked loose. Mount the camera first, dress the cable neatly second, then connect the power once the angle is confirmed.
I always prefer to test a live picture before sealing the wall entry and clipping everything down. A camera that looks fine on the bench can still be wrong once it is on the wall, especially if the lens catches a porch light, a reflective gutter, or a window edge. If the image is off, change the bracket position before you tidy the job.
A good first-pass sequence keeps the day moving, mount the camera, check the view on the recorder or app, adjust the angle, then secure the run and seal the entry. That order saves time because you are not making a neat installation around a poor shot.
Visible wiring should look deliberate. If it looks temporary, the system will feel temporary too.
Before the wall goes back to normal, run the basic tests properly, live view, motion trigger, night view, and remote access from inside the property. For camera hardening and access control best practice, the secure embedded system guide sits well alongside the rest of the setup work.
Configuring the NVR or DVR and Getting Remote Access Working
A camera system isn't finished when the hardware is on the wall. The recorder settings decide whether you get searchable evidence or a pile of clips nobody can use. Most DIY failures happen after the installation, when the owner leaves defaults untouched and assumes the system will sort itself out.
Give the recorder a sensible structure
Start by naming cameras in plain English, such as front door, driveway, side gate, or rear garden. That sounds obvious, but it saves time the first time you need to find a clip. Then set the resolution and frame rate in line with what the recorder and network can support, because overspecifying one part of the chain can make the system unstable.
Motion detection needs careful zoning. Ignore the tree that sways over the fence. Ignore the road if traffic keeps triggering the frame. Focus on the access path, the gate, or the doorway where a person enters. That's the difference between meaningful alerts and a phone full of noise.
If you want a wider view of secure device configuration, Sheridan Technologies has a practical secure embedded system guide that sits well alongside camera hardening and access control best practice.
Remote access should work, but it shouldn't be casual
Remote viewing is useful because it lets you check the property from a phone or laptop, but it should be set up with care. Default passwords need changing before the system goes online. After that, use the safest access method the kit supports, and only expose the recorder to the internet if you need to.
Practical rule: if remote access is unreliable on day one, fix that before you bury the cables or leave the job. Problems rarely get easier later.
Retention settings matter too. If the recorder overwrites footage too quickly, you may lose the clip you wanted. If you keep too much low-value video, the storage fills with unhelpful material. Set the retention behaviour so you can still retrieve evidence when something happens, then test it by playing back an older recording before you call the system finished.
The same goes for retrieval. If you can't get back to a clip in a minute or two, the setup still needs work.
Night-Time Performance and the Problems Most DIY Installations Miss
Daylight covers a lot of sins. At night, bad placement turns a decent camera into a blur machine. The light is lower, the movement is faster, and the surfaces that were harmless in the day start reflecting infrared in ways that break the picture.
IR glare and motion blur ruin more footage than bad cameras do
The first night-time problem is IR reflection. A camera pointed too close to a window, soffit, or glossy surface can bounce infrared light straight back into the lens, which washes out the image. The fix is usually simple, angle the camera away from reflective surfaces and keep the housing clear of nearby objects that catch the beam.
Another issue is motion blur, especially on shared driveways and vehicle approaches. A camera can look sharp in the menu and still fail on a passing car if the shutter speed is too slow. If you need number plates or moving vehicles to be recognisable, the system has to be set for that job, not just for a nice-looking live view.
Don't buy for megapixels alone
People overspend. A high-spec camera on a poor angle won't capture anything useful, while a modest camera aimed properly at a doorway can produce usable evidence. That's why I push homeowners to think in terms of recognisable evidence, not marketing labels.
A single smart doorbell can be enough for a flat, a small terrace, or a house where the front approach is the only real concern. A battery camera can also be enough for a simple entrance point if the night scene is clean and the Wi-Fi is stable. A wired multi-camera system makes more sense when the property has multiple access points, long approaches, outbuildings, or a driveway where after-dark detail matters.
If you're adding light, use it to help the camera rather than blind it. External IR or a controlled white-light illuminator can improve the scene, but only if it's placed with care. Otherwise, you just create another reflection problem.
UK Legal and Privacy Rules Every Homeowner Must Follow
The privacy question comes up on almost every install. Homeowners do not just ask whether the camera can see the gate, they ask whether it will upset the neighbours, whether the communal path is a problem, and whether a hallway camera inside the house goes too far. Those are the right questions to ask before the drill comes out.
Keep the field of view proportionate
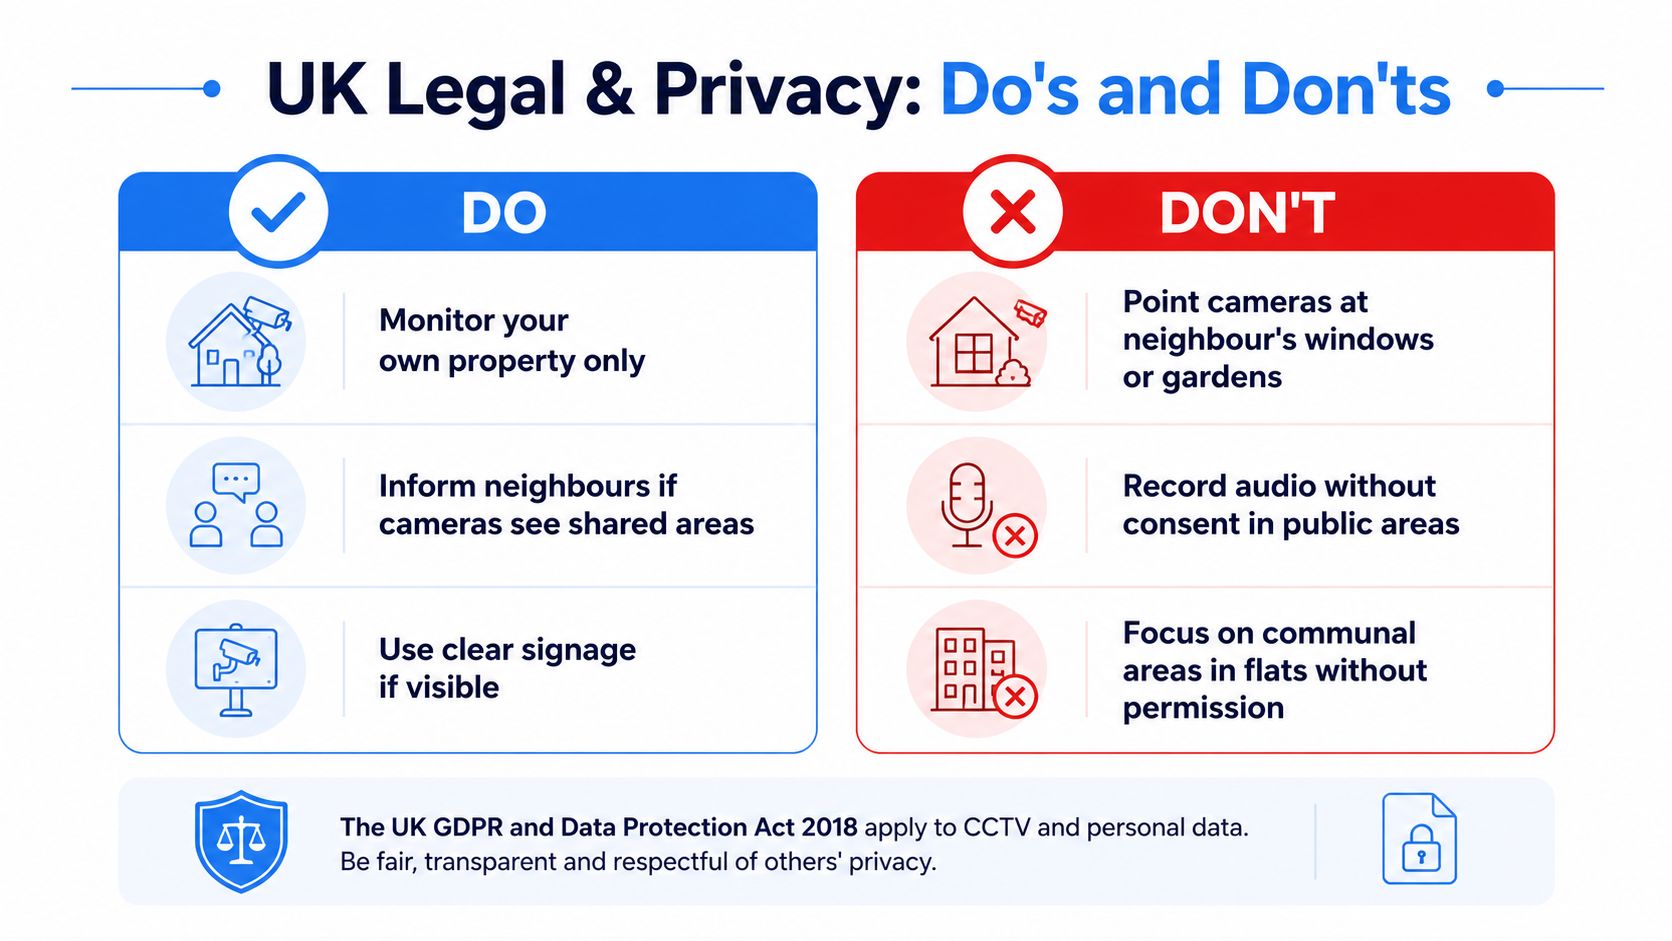
If a camera sees your own front door, that is normal. If it also sees a neighbour's windows, their private garden, or a shared driveway more than necessary, you have probably gone too far. The cleanest rule is to cover your own access points and blind spots, then trim the angle until the field of view is just broad enough to do the job.
For flats and communal buildings, shared entrances and common areas need a separate check. You need to think carefully before pointing a camera at spaces used by other residents, because the social and legal friction rises quickly in those settings. Indoors, avoid bedrooms and bathrooms entirely, and be cautious with family spaces where a camera could feel intrusive even if it is technically useful.
Signage, retention and neighbour questions
Clear signage is a sensible expectation if cameras are visible. It does not need to be theatrical, it just needs to be obvious enough that visitors and neighbours know they are being recorded. Retention should also be proportionate. Keep footage for as long as you need it for security, then let it overwrite naturally rather than stockpiling old video without a reason.
The privacy guide from Security.org flags the same practical pain points homeowners raise most often, namely neighbour-facing cameras, shared driveways, indoor coverage, signage, and what counts as intrusive placement (Security.org placement guide). That is why the best home installs are usually quiet and narrow in scope.
If a neighbour complains, do not argue from the driveway. Check the angle, reduce the field of view, and show that the system is focused on your property. A small adjustment often solves a big problem.
If you want to compare privacy concerns with the wider cost of a monitored setup, the home security monitoring cost guide gives a useful practical frame for how system choice affects the bigger picture over time.
When to DIY and When to Call a Professional Installer
A home CCTV job is usually worth doing yourself when the scope stays tight. One camera, a short cable run, a small flat, or a simple terrace can suit a confident homeowner with a drill, a ladder, and the patience to test everything properly. Once the property is larger, the cable routes stretch out, or the cameras need to look neat on a visible front wall, the chance of a poor finish rises quickly.
A simple rule for the decision
If you are happy drilling, running cable, sealing any holes, and checking remote access on the app, a wireless camera or a small PoE setup is realistic. If the job needs several external runs, awkward rooflines, care around listed buildings, or linking the CCTV with alarms and access control, a professional installer is the safer choice. That matters even more when the footage needs to hold up as evidence, rather than just giving you a rough clip to look at later.
Cost still matters, but it should not be the only factor. A practical view of the ongoing side of home security is in the Overton Security home security monitoring cost guide, which helps show how monitoring and system choice affect the overall picture over time.
Networking2000 works in CCTV installation, remote monitoring, and networked security systems, so it can handle the camera side and the connectivity side together. That helps when a home setup needs steady remote access, tidy cabling, and support after the cameras are mounted.
For homeowners in Romford, Hornchurch, Rayleigh, Brentwood, Chelmsford and Wickford, a local engineer can design the layout around the property instead of trying to fit a box-set kit to it. If you want the job done once, with cameras placed for real use rather than guesswork, speak to Networking2000 about a CCTV and networking package that fits the house, the access points, and the way you use the property.

