You've probably reached the point where a video doorbell isn't enough, or you're tired of guessing what's happening at the side gate, driveway, or back garden. That's usually when home CCTV moves from a “nice idea” to a proper weekend project.
The good news is that learning how to install cctv camera at home isn't complicated in principle. The bad news is that most mistakes happen before the first screw goes into the wall. Poor camera positions, weak Wi-Fi, messy cable routes, default passwords, and avoidable privacy issues cause more trouble than the actual mounting.
A sensible installation starts with coverage, then power, then network setup, then legal checks. In that order. Get that sequence right and even a modest system can work well for years.
Table of Contents
- Planning Your Home CCTV System
- Gathering Your Tools and Equipment
- Step-by-Step Camera Mounting and Wiring
- Configuring Your Network and Recording Setup
- UK Legal Requirements and Respecting Privacy
- Maintenance Tips and When to Call a Professional
Planning Your Home CCTV System
Buying cameras first and figuring the rest out later is how people end up with blind spots, trailing cables, and an app full of false alerts. Planning saves more time than any tool on the job.
Recent UK estimates put the number of CCTV cameras at around 4 to 6 million nationwide, while local authorities control only about 90,597 public cameras, which underlines how much domestic and private coverage matters in practice, especially for homes in London and Essex according to UK CCTV camera estimates and public camera figures.
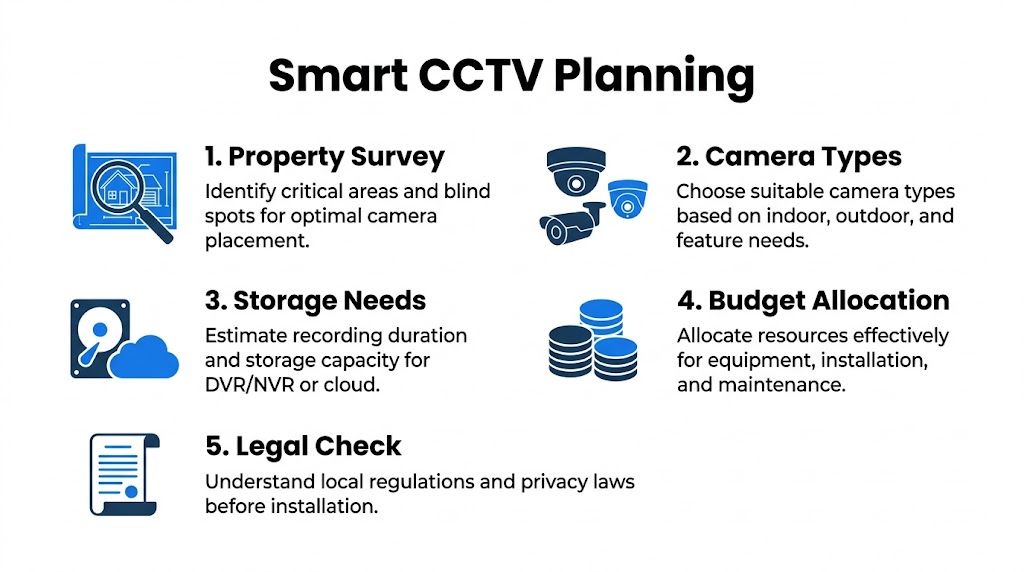
Survey the property before buying anything
Walk the outside of the house in daylight first. Then do the same after dark. You're looking for the places someone would approach without being seen, not just the most obvious doorways.
For most homes, the priority order is usually:
- Front entrance: Captures callers, deliveries, and anyone testing the front door.
- Rear access: Back doors and garden entries are often less visible from the street.
- Driveway or off-street parking: Useful where vehicles, tools, or side access matter.
- Side passage or gate: Often narrow, sheltered, and easy to miss from inside the house.
- Ground-floor vulnerable points: Windows, patio doors, and detached garages.
Don't mount cameras too high just because it feels safer. A very high camera often gives you the top of a hood instead of a usable face. Aim for a clear angle with enough downward view to identify a person without losing the approach path.
Practical rule: If a camera can only see movement after someone is already at the door or gate, it's too late. Cover the approach, not just the final point of entry.
Weather matters too. Exposed corners, coastal wind, driving rain, and shaded brickwork all affect the type of housing and mounting hardware you need. If you're comparing exterior models, this guide to Waterproof security cameras for tough weather is useful for understanding what outdoor protection really means in rough conditions.
Choose the camera technology that suits the house
The right system depends less on what's fashionable and more on what the property allows. A solid Victorian terrace with awkward wall runs has different needs from a newer detached home with easy loft access.
Here's a practical comparison.
| CCTV Camera Technology Comparison | Best For | Pros | Cons |
|---|---|---|---|
| IP camera | Homes wanting sharper digital video and app access | Flexible features, easy recorder integration, good remote management | Needs proper network setup |
| Analog camera | Replacing or extending older coax systems | Familiar setup, can suit existing cabling | Less flexible for modern network features |
| Wi-Fi camera | Small installs where cabling is difficult | Fast to deploy, low disruption | Performance depends on signal strength and stable power or battery routines |
| PoE camera | Permanent home installs with reliable wiring | One cable for power and data, stable connection, cleaner long-term setup | Needs cable routing and basic networking skill |
PoE is usually the neatest choice for a durable installation. It avoids separate local power at each camera and behaves more predictably than Wi-Fi when walls are thick or the router is badly placed.
Wi-Fi cameras still have a place. They're handy for a single rear outbuilding, rental situations, or a quick temporary layer of coverage. They're less forgiving when the signal is weak or the homeowner expects commercial-grade reliability without doing any network checks.
Plan power, storage and future expansion
Think about where cables will run. Through a loft, behind soffits, down conduit, or internally to a cupboard under the stairs all work well. What doesn't work is buying a recorder and only later realising that the clean cable path crosses a bathroom, steel beam, or finished extension ceiling.
Sketch these points before you order equipment:
- Camera positions and what each one must see.
- Cable paths through lofts, walls, or external conduit.
- Recorder location with power, ventilation, and network access.
- Storage approach using NVR, DVR, or cloud depending on the system.
- Spare capacity for one or two future cameras.
A small system with room to grow is better than an oversized one full of marginal views. If the house layout changes, or a shed, office, or side extension gets added later, spare channels and a sensible cable route will save a lot of rework.
The cleanest installs usually look under-planned from the outside. That's because the planning happened before any hardware went on the wall.
Gathering Your Tools and Equipment
A home CCTV install goes more smoothly when everything is laid out before you start. The frustrating version is climbing the ladder, marking the holes, then discovering the wrong wall plugs, no sealant, or a cable tester with a dead battery.
Core tools for a clean install
Keep the basic kit simple and dependable. For most houses, that means:
- Sturdy ladder: Stable footing matters more than speed.
- Drill and bit set: Masonry bits for brick, wood bits for soffits and timber runs.
- Screwdrivers and driver bits: Camera housings rarely use the same fasteners throughout.
- Tape measure and pencil: For bracket spacing and neat cable alignment.
- Spirit level: Helpful for bullet cameras and external conduit.
- Cable rods or fish tape: Essential for lofts, cavities, and awkward wall drops.
- Sealant gun with exterior-grade silicone: Stops damp around cable entries.
- Cable clips or conduit: Protects runs and keeps the finish tidy.
Have a torch or headlamp ready as well. Loft work, meter cupboards, and evening testing are harder than people expect.
System-specific kit people often forget
The tools change slightly depending on the type of system.
For PoE/IP setups, the usual extras are:
- Cat5e or Cat6 cable
- RJ45 connectors
- RJ45 crimp tool
- Network cable tester
- PoE switch or NVR with PoE ports, where needed
For analogue systems, you'll normally need:
- Coaxial cable
- BNC connectors
- Compatible power supply
- DVR and video output lead for setup
Two small items save a lot of hassle outdoors. One is a pouch of assorted wall plugs that match the wall type. The other is weatherproof tape or junction protection for exposed joins.
If the installation is getting beyond a standard DIY layout, such as multiple cable routes, recorder placement in a comms cupboard, or integration with existing network hardware, some homeowners choose to bring in a specialist. Networking2000 carries out CCTV installation and site survey work as one option for homes and businesses that need a more structured setup.
Step-by-Step Camera Mounting and Wiring
The physical install is where most DIY jobs either become neat and reliable, or messy and difficult to maintain. The difference usually comes down to patience.
Test first and mount second
Before you drill anything, connect the camera to the recorder or app at the intended location and confirm that the view is right. Industry guidance for home camera installs recommends pairing and live testing before permanent mounting, then checking live feed quality, night vision, motion settings, recording schedules, and privacy masks using practical home security camera installation guidance.
This matters more than people think. A position that looks fine from the ground can end up seeing too much sky, too much glare from a porch light, or not enough of the walkway.
Use this quick sequence:
- Power or connect the camera temporarily
- Check the image in the app or NVR
- Adjust the angle
- Confirm night view if possible
- Only then mark the fixing holes
Test at ground level whenever you can. Solving a weak signal or bad angle is much easier before the ladder comes out.
Drill, route and protect the cable properly
Once the position is confirmed, mark the bracket holes and the cable entry point. Drill carefully, especially on older brick where faces can blow out if you rush the last bit of pressure.
For wired installs, cable routing is the true craft part of the job. A dependable benchmark is that each PoE Cat5e or Cat6 run should not exceed 100 metres (325 feet), and longer distances should use a switch or PoE extender, as noted in CCTV cabling and PoE distance guidance.
Good routing habits are simple:
- Follow natural lines: Eaves, soffits, corners, and downpipe routes hide cables well.
- Use conduit on exposed brick: It protects the cable and looks intentional.
- Leave a drip loop outdoors: Let the cable dip below the entry point so water falls away before it can track inside.
- Seal every external hole: Damp ingress causes far more grief than the camera itself.
- Secure the run properly: Loose cable moves in wind and gets damaged over time.
If you need extra help on keeping exposed joins dry, these Products for Automation industrial component tips are a useful reference for waterproofing electrical connections in a more durable way.
A common mistake is forcing cable through the shortest route instead of the best route. The shortest route may cross hot pipework, leave cable visible at hand height, or create tight bends behind the camera base. Neat cable runs don't just look better. They last longer and are easier to troubleshoot.
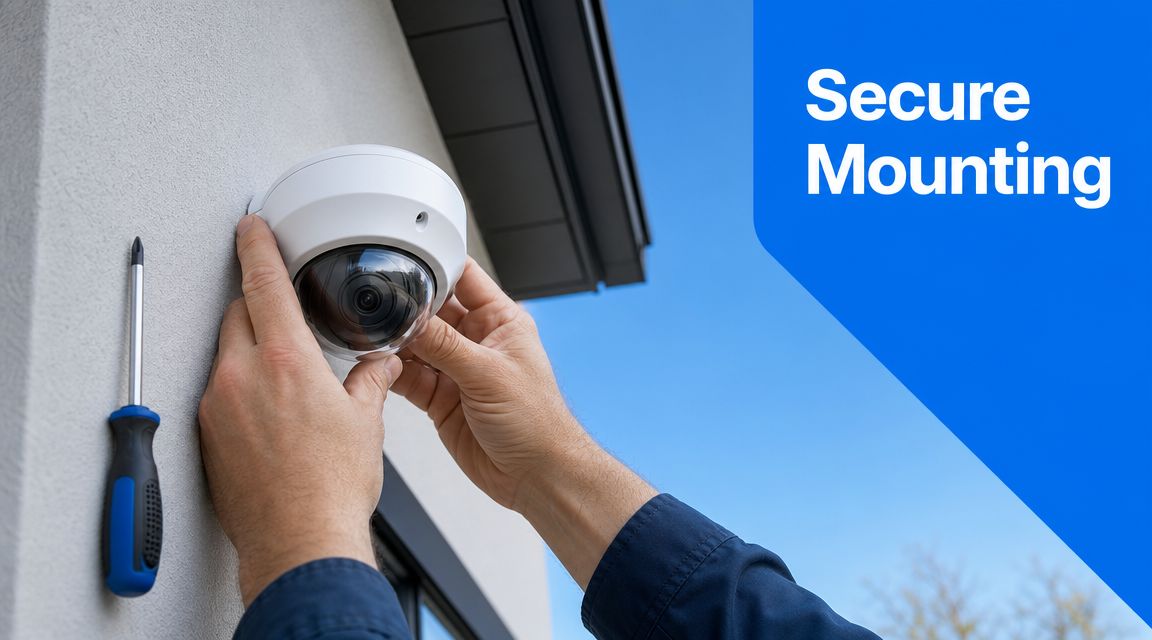
Final fixing and live checks
After the cable is in place, mount the base firmly, connect the camera, and dress the cable so there's no strain on the connector. Strain is easy to miss at first and often shows up later as intermittent faults in wet or cold weather.
At this stage, check:
- Bracket firmness: No twist or wobble when touched.
- Lens direction: Cover the approach path, not just the doorstep.
- Focus and framing: Trim out excess sky, walls, and irrelevant space.
- IR reflection risks: Watch for gutters, white soffits, and nearby brick causing night glare.
This walkthrough can help if you want a visual reference before doing the final pass.
Once all cameras are up, do a full walk test. Approach each protected area the way a visitor or intruder would. Check daytime image, low-light image, and whether motion starts recording early enough.
A camera that records a clear shoulder after the person has passed underneath it isn't positioned well enough.
Configuring Your Network and Recording Setup
Mounted cameras aren't a finished system until recording, playback, and remote access are working properly. This is the point where tidy physical work can still be undone by poor digital setup.
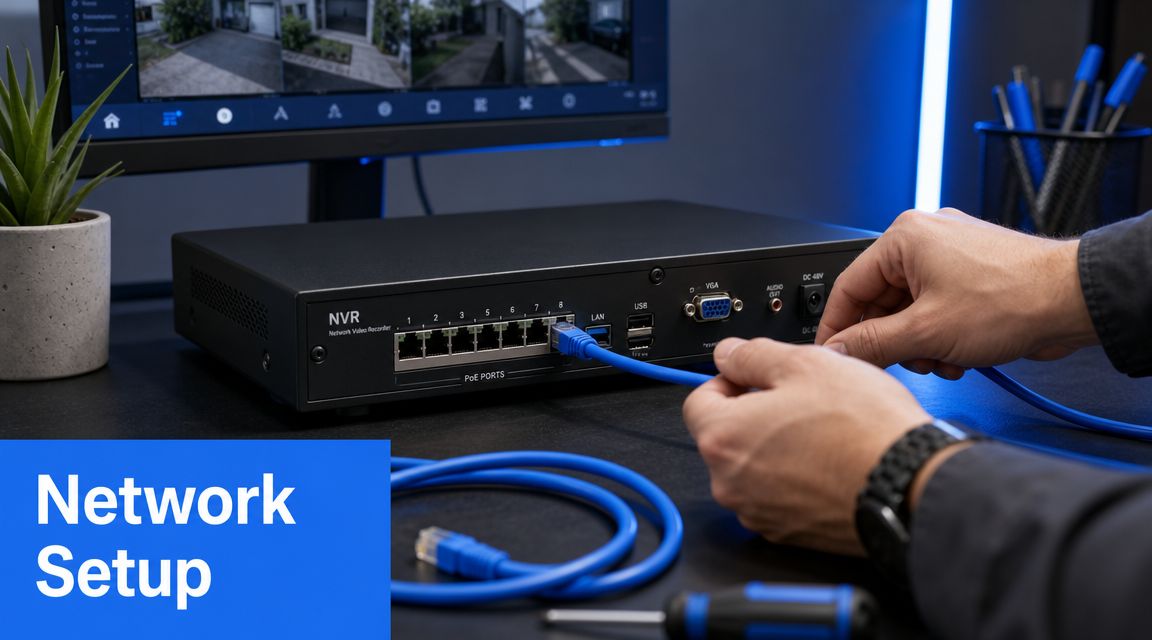
Bring the recorder online properly
Start with the recorder. If you're using an NVR or DVR, connect each camera, confirm it appears correctly, and make sure the hard drive is ready for recording through the recorder's setup process.
A practical order works well:
- Connect all cameras first
- Name each camera by location
- Check date and time settings
- Confirm live view from every channel
- Set the recording mode
- Test playback before leaving the menu
Naming matters more than is widely realized. “Camera 1” means nothing when you need footage quickly. “Front door”, “Driveway”, and “Rear gate” make review much easier.
Lock down remote access
Cybersecurity is part of installation, not an optional extra. The UK's National Cyber Security Centre advises changing default passwords, enabling multi-factor authentication where available, keeping firmware updated, and isolating IoT devices on a separate network where possible, as summarised in this guide to CCTV password and network security practices.
The immediate jobs are straightforward:
- Change the default admin password: Use a strong, unique password.
- Update firmware: Do it early so you're not building the system on old software.
- Enable multi-factor authentication: If the app or recorder supports it, switch it on.
- Use a separate network or VLAN if available: That keeps camera traffic away from everyday devices.
If you also work from home, the wider habits in this guide to home network security for remote workers are worth following because CCTV now sits on the same domestic network as laptops, phones, and printers in many homes.
If the camera app is convenient but the password is still the factory default, the install isn't finished.
Set recording rules that match real life
A system that records everything all the time isn't always the most useful one. Continuous recording can be right for some homes, but many people get better results from a sensible mix of scheduled recording, motion triggers, and app alerts.
Tighten the settings with a practical eye:
| Setting area | What to aim for | What often goes wrong |
|---|---|---|
| Motion zones | Focus on gates, doors, paths, and parked vehicles | Trees, roads, and pavements cause constant alerts |
| Notification rules | Send alerts for relevant movement only | Every passing headlight triggers the phone |
| Night mode | Check IR image on the actual site | Porch lights or reflective surfaces wash the image out |
| Playback retention | Make sure useful footage is easy to find | Poor naming and no schedule logic make searches slow |
Do a final remote test from mobile data rather than home Wi-Fi. If live view, playback, and alerts all work away from the house, the setup is behaving properly.
UK Legal Requirements and Respecting Privacy
The legal side is where many DIY guides go vague, but it matters. A camera can be physically perfect and still create problems if it captures more than it should.
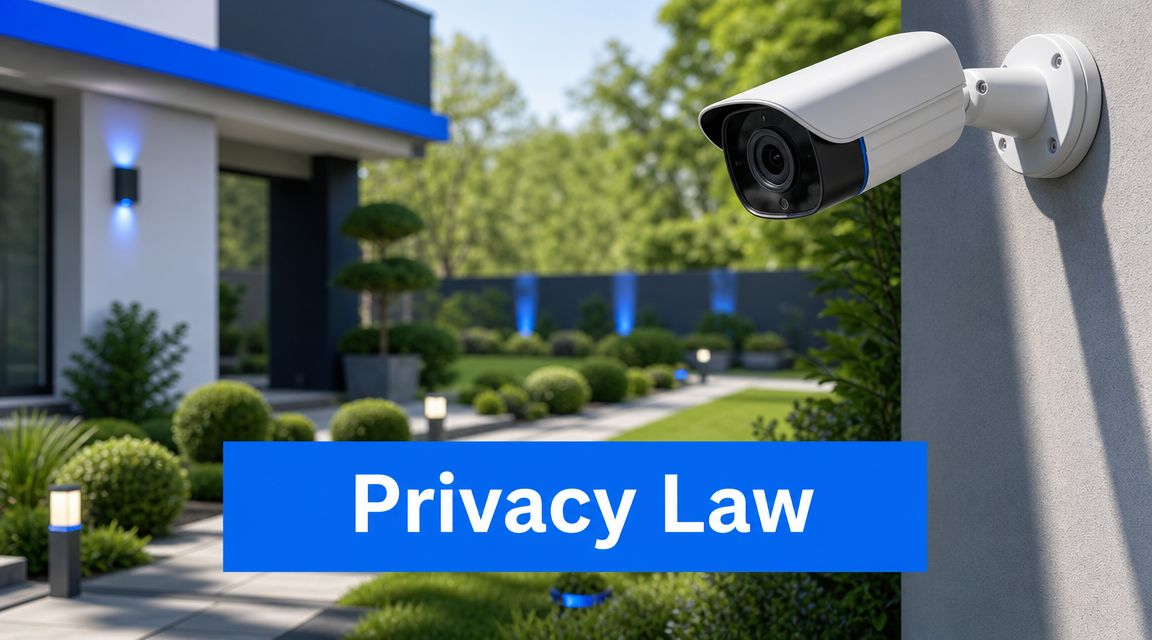
When home CCTV becomes a data protection issue
Under the UK GDPR and Data Protection Act 2018, domestic CCTV can create legal obligations if it records anything outside your property boundary, and the ICO advises using privacy masking and clearly explaining that recording is taking place, as outlined in this overview of UK home CCTV placement and privacy guidance.
That catches more homes than people expect. A front camera on a terraced street may also pick up the pavement. A rear camera may clip a neighbour's garden. A side camera may see into a shared access route or communal hallway.
This doesn't mean you can't protect your home. It means you need to do it carefully and proportionately.
What that means in day-to-day practice
Aim cameras so they capture your boundary and approach path without wandering into other people's space more than necessary. If your system allows it, use privacy masking to block out neighbouring windows, gardens, or parts of the street that aren't relevant.
These habits help avoid complaints and keep the install sensible:
- Reduce the field of view where possible: Wider isn't always better.
- Use privacy masking: Black out areas you don't need to record.
- Be transparent: A simple sign stating CCTV is in operation is a sensible step where external areas are recorded.
- Think about audio carefully: Audio can feel much more intrusive than video.
- Review the live image from the pavement or boundary line: Check what the camera sees in real conditions.
A lot of disputes start because a homeowner thinks the camera “only points at our front door”, while the live view includes a neighbour's bay window or half the shared path. Always verify the true frame, not the intended one.
Good CCTV protects your property without turning the neighbour relationship into a project of its own.
For London terraces, maisonettes, and tight suburban plots in Essex, this is especially important. Narrow frontage and close boundaries make over-recording easy unless the angle is set carefully.
Maintenance Tips and When to Call a Professional
A CCTV system isn't fit-and-forget. It needs occasional checking, especially after heavy weather, router changes, or power cuts.
Simple checks that keep the system reliable
Most maintenance is basic and doesn't take long:
- Clean lenses and housings: Dust, cobwebs, and water spots soften the image quickly.
- Check live view: Make sure each camera is still online and framed properly.
- Review recordings: Confirm footage is saving and can be played back.
- Test alerts: Motion notifications can drift after firmware updates or app changes.
- Inspect external cable runs: Look for loose clips, cracked sealant, or UV wear.
If a camera suddenly seems worse at night, don't assume the sensor has failed. Spider webs, new reflective surfaces, or a shifted angle often explain it.
Jobs that are better left to an engineer
DIY is realistic for a straightforward home install with clear cable paths and a small number of cameras. It becomes less sensible when the job involves awkward fabric, network complexity, or compliance pressure.
Professional help is usually the safer route when:
- The property is listed or difficult to drill
- Cable routes need multiple switches or long structured runs
- You're integrating CCTV with alarms, access control, or wider networking
- The system is for a business premises rather than a simple home setup
- You want clean external conduit work and reliable recorder placement without trial and error
Networking2000 has been designing and installing bespoke CCTV systems since 1998, and for larger homes, mixed home-office environments, and business properties across London and Essex, that kind of structured installation often saves time, rework, and avoidable support issues.
If you'd rather have the system planned, cabled, configured, and checked properly from the start, Networking2000 can help with CCTV installation, networking, and security setup for homes and businesses across London and Essex.